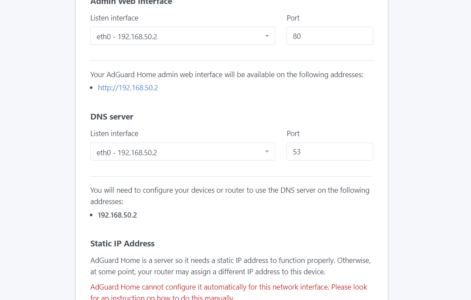
This tutorial will teach you how to duplicate Lucid’s Pi4 project.
In this tutorial I will teach you how to setup a DNS blackhole that will filter out ads and malicious sites on the DNS level along with some other functionality. This will be achieved using AdGuard Home inside of a Docker container (standalone) that will be monitored by Netdata on top of Ubuntu Server for Raspberry Pi.
Some optional steps that will be explained here are how to enable the Raspberry Pi to boot from USB, how to setup a DDNS on the router (Asus RT-AX58U router on asuswrt-merlin), IP Passthrough (and disable all firewall settings) on an Arris gateway that was provided by AT&T U-Verse, how to setup a Wireguard VPN Server (including port forwarding), how to turn off the DHCP server on the router and use the one built into AdGuard Home, and how to disable/uninstall cloud-init on Ubuntu Server for Raspberry Pi.
The purpose of the VPN is to be able to use the ad blocking features when out of the house. Most residential ISPs don’t offer enough bandwidth to maintain a fast or reliable connection to your private VPN so this is only recommended for those super pesky sites that bury content behind multiple ad overlays or break every half paragraph with an ad.
Some optional, but recommended steps that will be explained here are how to change the default user of the ubuntu server (cloud-init makes a default one), how to install Portainer (a GUI for docker) and Watchtower (a service that automatically updates all containers).
The purposes of these are pretty self explanatory; auto updates means less maintenance and checking on the Pi4 and the GUI is a place to see all the details of your containers, volumes, images. stacks, templates, etc including the ability to create new ones and delete ones not being used.
Disclaimer: Your results may vary. All equipment and tools used will be linked and referenced with the specific model # (excluding the gateway) and version number at the time of making this tutorial. I am using a 3rd Party firmware on top of my router that unlocks some features and adds some functionality that might not be available on your model, the stock firmware, or another manufacturer’s router. I will go over how to install this firmware in the tutorial. You do not need 3rd party firmware to use DDNS on your network as it is built into the stock firmware of the Asus router. There are plenty guides online with ways to setup DDNS using many different methods and setups. This is just my preferred method.
This tutorial is not sponsored or funded by any of the services, companies, or manufacturers listed or referenced to in this tutorial. I am simply a tech enthusiast sharing my knowledge and creating a guide on how to replicate a personal project I created that gained some attention.
Requirements
Raspberry Pi4
Raspberry Pi 15.3W (5.1V/3A) USB-C Power Supply
32GB Micro SD card
Micro SD Card Reader (if your PC has a Micro SD card reader then you can skip this)
SSH Utility (Windows 10 now has a built in one [OpenSSH])
Recommended
4GB model (for extra headroom)
Micro HDMI Cable
USB keyboard/mouse
32GB usb flash drive or external SSD drive (minimum) [usually offers faster r/w speeds]
Heat sinks/spreaders (headers)
Vented Case (fan is a plus)
Finding a kit that has all of this will save you money and make thing much easier.
What I will be using
LABISTS Raspberry Pi 4 4GB Complete Starter PRO Kit with 32GB Micro SD Card
Includes: Raspberry Pi 4 model B board, 32G SanDisk Ultra Micro SD card, USB A & C Micro SD card reader, 2 Micro HDMI to full HDMI cables, LABISTS Raspberry Pi 4 case, 5.1V/3A power supply with switch, 3 Copper Heatsinks , 1 5V fan.
Logitech K830 Wireless Keyboard with Built-in Touchpad
Samsung FIT Plus USB 3.1 Flash Drive 128GB
Ethernet cable & unmanaged network switch to hardwire the Pi4 to the network.
Arris Gateway (AT&T Provided)
Asus RT-AX58U router running asuswrt-merlin
OpenSHH through Windows 10 Powershell on version 20H2
Other tools, utilities, and applications will be mentioned throughout the tutorial.
Steps
I will not be teaching you how to “build” a Pi, setup your SSH client, connect the Pi to a WiFi network (I am using ethernet), or how to setup the display, keyboard, mouse, or initial network settings for your Pi
(Optional for DDNS, easier port forwarding, and uninterrupted flow of data to the router)
IP Passthrough
Disable Gateway Firewall
Install asuswrt-merlin (Optional)
DDNS Setup (Optional for VPN)
Install Ubuntu Server onto the USB Drive
Enabling Boot From USB
Modify Ubuntu Server for USB Boot Note: At the time of making this tutorial there was a bug with Ubuntu Server where it wouldn’t boot from USB. If the bug has been fixed on the version you are using you can skip this step.
Changing the Default User
Static IP Note: If the settings don’t take and are reset upon reboot then go to Disable/Remove cloud-init section and try these steps again.
Update Hostname Completely optional. Makes the device easier to identify and find on the network.
Disable/Remove cloud-init Optional. If the your IP settings were not reset by cloud-init on your reboot then you can skip this step. I still recommend disabling it as it will speedup boot times. You only really need cloud-init for the first boot.
Install Netdata
Install Docker
Netdata Config Note: This is not out of order
Install Portainer
Install Watchtower
Install AdGuard Home
Configure AdGuard
Route Network Traffic to AdGuard
Enable DHCP on AdGuard (optional)
Note: You can do most of this directly with a mouse/keyboard connected to the Raspberry PI or through SSH. I will be showing you the SSH way since it is easier for me to grab screenshots and outputs of my SSH terminal than it is to collect screenshots from the Pi itself.
To use SSH we need to know the IP of the device and make sure it is enabled (for Raspbian). We can enable SSH in raspbian using the Raspberry Pi Configuration utility. Assuming you are using an Asus router click on the “devices” list on the main status page. A list of devices show up. We will be looking for raspberrypi or ubuntu.
IP Passthrough
(Optional, but required to use DDNS on your home network.)
I am using IP Passthrough to not only bypass and disable the firewall of the gateway, but to eliminate a dual NAT network, allowing for the use of the router’s built in DDNS, and easier port forwarding functionality.
To enable IP Passthrough on the Arris Gateway you will need to know the MAC address of the ASUS RT-AX58U or the IP address currently assigned to the router. To find the MAC or current IP you can check the main status page.


MAC Address highlighted with the blue box and the WAN IP which is censored out in the screenshot since this router is already being assigned a routable IP.
Now that we know the current IP/MAC of the router we can go find it in the MAC Address list in the IP Passthrough tab of the Firewall page in the Arris gateway.


You IP Passthrough page should look similar to this once you are done. Double check that the MAC address is the proper device before hitting apply. Now you will simply want to restart your router so it can be assigned it’s new WAN address, which should be the address assigned to your gateway from your ISP.
Troubleshooting Tip: If your router cannot connect to the internet after enabling IP Passthrough you may need to reset your IP in the diagnostics page of the Arris gateway and then try restarting the router again. If that didn’t work I would recommend unplugging both and waiting for your gateway to fully boot and estable it’s connections before plugging the router back in.
Disable Firewall on the Gateway
(Optional to allow uninterrupted flow of packets directly to the router and thus to AdGuard and easier port forwarding, but a recommended 2nd step to finalizing IP Passthrough)
On the same firewall page there should be a tab called “Firewall Advanced”. Click that and disable all the firewall setting to make sure nothing interferes with your IP passthrough and all traffic that is meant for the router can flow to it uninterrupted.


The firewall status page should look like this afterwards. Sometimes there are packed filters enabled by default. These can be turned off by clicking on the “Packed Filter” tab and the button that appears right below it “Disable Packet Filters”.
Install asuswrt-merlin
(Optional)
I will be using version 386.1_2 (Stable) as it is the latest version available at the time of making this tutorial.
To download the firmware simply go to https://www.asuswrt-merlin.net/ click on the download button at the very top of the page and then choose the model number of your router.


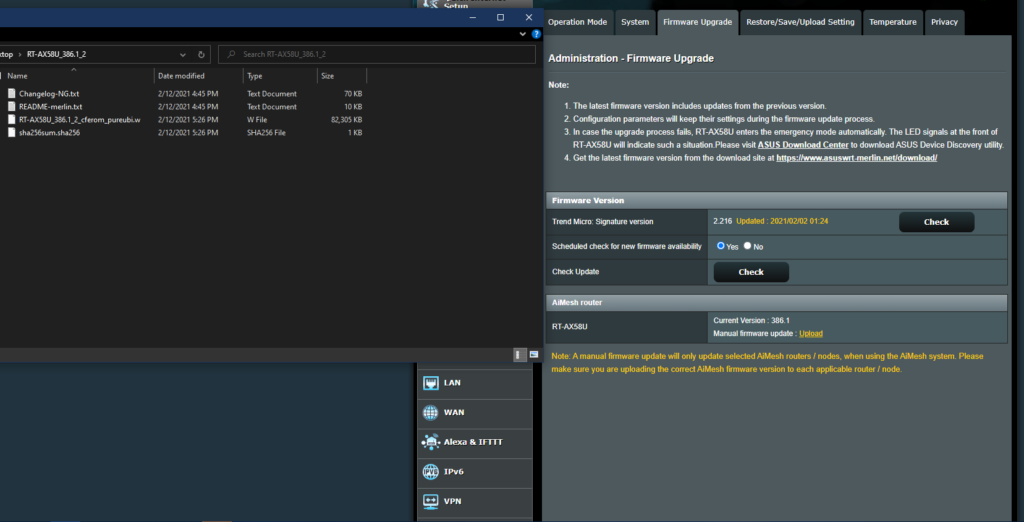
You will now want to unzip the file and under Advanced Settings click on Administration and then Firmware Upgrade tab and upload the .w file to the router.
I have skipped this step since there is no way to confirm before starting the upgrade. You can see the manual upload button and the contents of the zip you download (if you clicked the direct download link above). Your file structure should look similar with the proper version and model number on the .w filename.
Feel free to explore your added features and functionality and re-configure your router to your needs and current network requirements.
DDNS Setup
(Optional, but required to host a VPN to your home network.) You do not have to use the built-in DDNS functionality of the router. You can use whatever you want as long as it works and is reliable. I recommend this method because it is simple and easy to setup and use.
This next step will be setting up the DDNS settings and enabling lets crypt through it. This process is pretty straightforward as it is built into the stock firmware and asus had their own DDNS service that they integrate into their routers.
Under Advanced Setting click on WAN and then go to the DDNS tab.
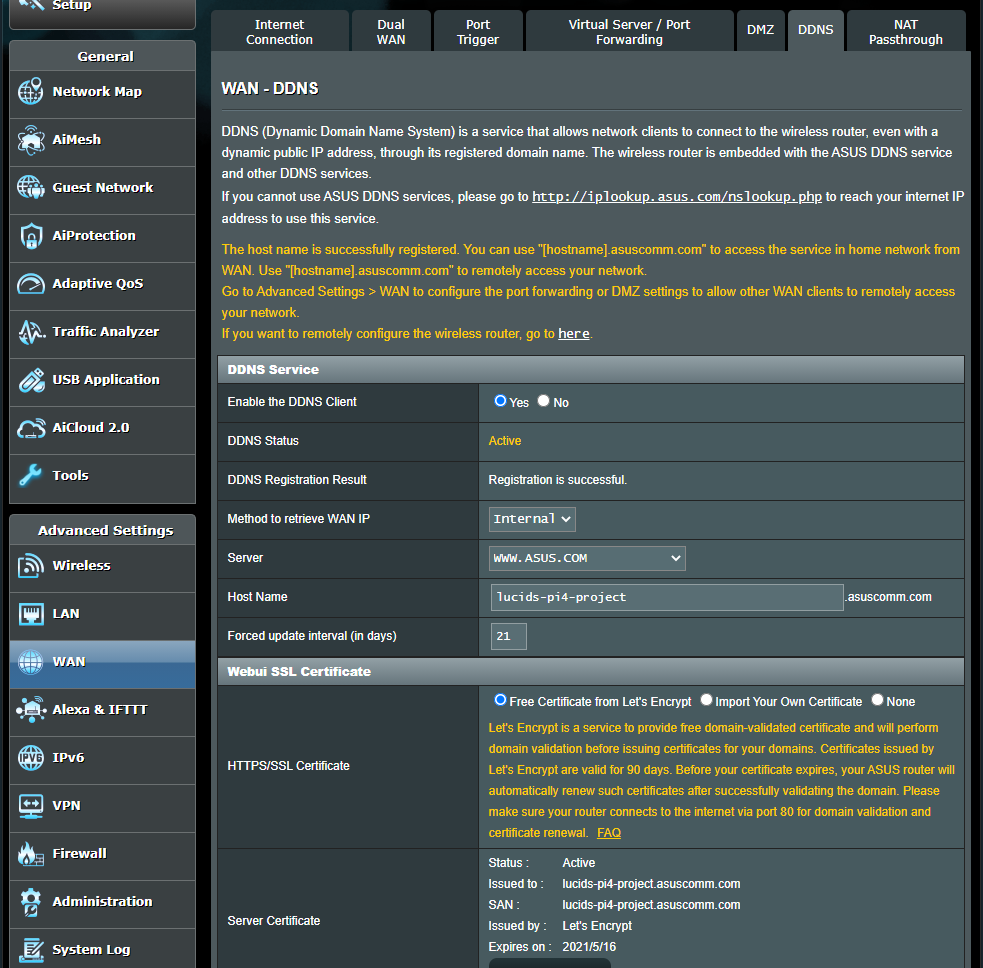
In the dropdown menu select asus.com as your server (or your preferred provider) and type in a host name or whatever the service you choose requires.
Note: You might not see HTTPS/SSL settings until the service is registered and active. This also might not be necessary if you don’t plan to have an externally facing web page (80/443). I set this up anyways because it’s there and it’s 1 click. It’ll be there if I need it.
Install Ubuntu Server onto the USB Drive
I will be using Ubuntu Server 20.04.2 LTS as it is the latest version available at the time of making this tutorial. You can find the latest version at https://ubuntu.com/download/raspberry-pi
Note: You do not need to download the image yourself, the Pi imager can download and validate the integrity of the files automatically (this is what will be shown and used for this tutorial).
We will be installing this to our 128GB USB 3.1 stick using Raspberry Pi Imager 1.5 You can find the latest version at https://www.raspberrypi.org/software/
After downloading the Pi Imager tool click on the dropdown for “Operating Systems” > “other general purpose OSs” > “Ubuntu” > “Ubuntu Server 20.04.2 LTS [or current version] (RPi 3/4/400) 64-bit”
If you downloaded the image yourself then there is an option to use a custom image near the bottom of the main dropdown menu.

Then select your storage device

Then click on write and wait
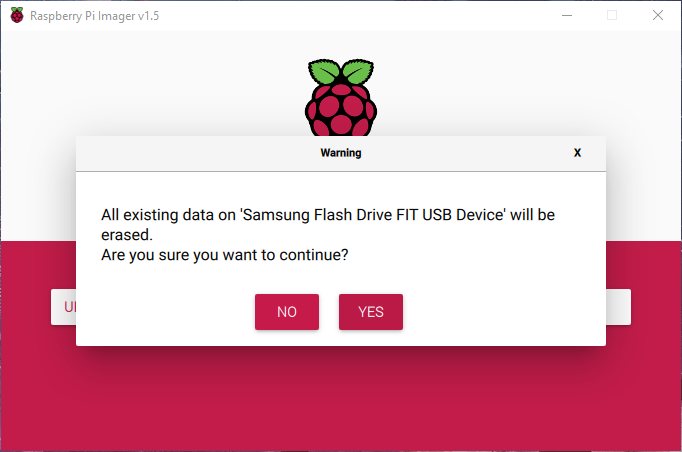
Note: Even though the program erases the drive before installing the OS to it, it is still good practice it use the “erase” function of this tool before installing an image with it.
Enabling Boot From USB
(Optional) This will not be needed if you are planning to use an SD to boot Ubuntu Server from. You also won’t need to enable this if you don’t plan to be using the SD card at all as the 2nd boot is USb by default.
We will need to use Raspberry Pi OS. You can create a drive with it using the Pi Imager and clicking the first option at the top. I would recommend using the Micro SD card that came with your Raspberry Pi kit (if you bought one) or the one that came with your Pi (if it came with one) [a lot of resellers will offer an SD card with the board. If you didn’t buy a kit and your board didn’t come with an SD card then use any 32GB SD card you have laying around.]
I will not be providing any screenshots for this next step. If you need any please lookup a guide elsewhere.
According to the official guide we first need to make sure our bootloader was made on or after Sep 3 2020. I go over how to force an update in the troubleshooting part of this section. Typically you can install the EEPROM boot recovery utility with the Pi Imager tool. It can be found under Misc utility images. This will install the latest bootloader to the Pi. To check the version simply power on the Pi with no bootable media inside.
If your bootloader is up to date then proceed with installing Raspberry Pi OS onto your spare SD card. It is a good idea to keep this disk around in case you need to change any other settings in the future.
After installing a Raspberry Pi OS image to a disk you would want to make sure it’s up to date.
sudo apt update
sudo apt full-upgrade

// One line exec: //
sudo apt update && sudo apt full-upgrade
Then pressing enter at any prompts.
After the OS is installed and updated we then need to open the raspi-config utility you can do so by running
sudo raspi-configInside this config there should be an “Advanced Options” and within there look for something pertaining to boot options or boot order. Change the first or default to USB mass storage then shutdown and remove the Raspberry Pi OS disk from the Pi.
It should now boot Ubuntu Server from the USB drive.
Troubleshooting
If you have any issues booting from USB the first thing you want to do is check the value of the rpi-eeprom-update file.
sudo nano /etc/default/rpi-eeprom-updateThe default value is FIRMWARE_RELEASE_STATUS is “critical” we want to change that to “stable”. Use ctrl+x to save and exit. Then run the update manually.
sudo rpi-eeprom-update -d -aYou can then check the version by running
vcgencmd bootloader_versionIt should be June 15, 2020, or later release for the USB boot feature to work successfully. The latest stable bootloader version as of this writing was January 16, 2021.
Modify Ubuntu Server for USB Boot
Note: At the time of making this tutorial there was a bug with Ubuntu Server where it wouldn’t boot from USB. If the bug has been fixed on the version you are using you can skip this step.
We will be using this tutorial to modify our Ubuntu 20.04 image to allow it to booted from USB. I will provide a summary of the important steps or you can use their guide if you prefer the more detailed explanations.
First we will need to boot into our Raspbain (Raspberry Pi OS) system.
Once booted insert the fresh install of Ubuntu 20.04 and use this command in your local or ssh terminal to locate your storage device:
lsblkYou should get an output similar to this:
NAME        MAJ:MIN RM   SIZE RO TYPE MOUNTPOINT
sda           8:0    1 119.5G  0 disk
├─sda1        8:1    1   256M  0 part /media/pi/system-boot
└─sda2        8:2    1   2.8G  0 part /media/pi/writable
mmcblk0     179:0    0  29.8G  0 disk
├─mmcblk0p1 179:1    0   256M  0 part /boot
└─mmcblk0p2 179:2    0  29.6G  0 part /
The SD card will always start with mmcblk so you can rule that one out. Odds are sda is the USB stick. This will vary depending on the type of drive and if any adapters are being used. Substitute whatever yours is in place of /dev/sda in these instructions going forward.
The guide then instructs us unmount the drive:
sudo umount /media/pi/writable
sudo umount /media/pi/system-boot
Then we make some new moutpoints and mount the USB drive to them. Remember to substitute /dev/sda where necessary.
sudo mkdir /mnt/boot
sudo mkdir /mnt/writable
sudo mount /dev/sda1 /mnt/boot
sudo mount /dev/sda2 /mnt/writable
Once that is done you can run lsblk again and get a similar result:
NAME        MAJ:MIN RM   SIZE RO TYPE MOUNTPOINT
sda           8:0    1 119.5G  0 disk
├─sda1        8:1    1   256M  0 part /mnt/boot
└─sda2        8:2    1   2.8G  0 part /mnt/writable
mmcblk0     179:0    0  29.8G  0 disk
├─mmcblk0p1 179:1    0   256M  0 part /boot
└─mmcblk0p2 179:2    0  29.6G  0 part /
Automated Script
I will be using the automated script provided by the author of that guide to make my distro bootable. You can skip this step and follow the manual way to make your distro bootable if you want to avoid using scripts.
Run the script with 1 line:
sudo curl https://raw.githubusercontent.com/TheRemote/Ubuntu-Server-raspi4-unofficial/master/BootFix.sh | sudo bashThe output should be similar to:
  % Total    % Received % Xferd  Average Speed   Time    Time     Time  Current
                                 Dload  Upload   Total   Spent    Left  Speed
100  8552  100  8552    0     0  19796      0 --:--:-- --:--:-- --:--:-- 19842
Found writable partition at /mnt/writable
Found boot partition at /mnt/boot
Cloning into 'rpi-firmware'...
remote: Enumerating objects: 8767, done.
remote: Counting objects: 100% (8767/8767), done.
remote: Compressing objects: 100% (4688/4688), done.
remote: Total 8767 (delta 3656), reused 5106 (delta 3398), pack-reused 0
Receiving objects: 100% (8767/8767), 98.91 MiB | 3.76 MiB/s, done.
Resolving deltas: 100% (3656/3656), done.
Checking out files: 100% (7362/7362), done.)
Updating firmware...
Decompressing kernel from vmlinuz to vmlinux...
Kernel decompressed
Updating config.txt with correct parameters...
Creating script to automatically decompress kernel...
Creating apt script to automatically decompress kernel...
Updating Ubuntu partition was successful!  Shut down your Pi, remove the SD card then reconnect the power.
If everything was mounted properly then you should be able to boot from the USB drive now. To test this we can turn off the Pi, take out the SD card, and then turn it back on with the patched Ubuntu drive still in.
Changing the Default User
(Optional, but recommended for security reasons.)
The default user/pass combo is ubuntu/ubuntu. The system will force you to update the password on your first login, but the default user will still be ubuntu. For security I always make a new one and removing the old one.
After updating the password you will first want to make sure ubuntu is up to date. I recommend restarting after your first login and updating your password as it can give some issues when trying to update.
sudo apt update && sudo apt -y upgradeFirst lets make a new user and add it to the sudo user group.
sudo adduser USERNAME
sudo usermod -aG sudo USERNAME
I recommend rebooting here just to make sure the ubuntu user isn’t using any processes. Then we can login to the new user and delete ubuntu using this command:
sudo deluser ubuntu
sudo rm -r /home/ubuntu
You can optionally move the home directory to the new user. This shouldn’t matter though because it should be empty. I personally skipped this step.
sudo usermod -d /home/newHomeDir -m newUsernameStatic IP
You can try doing this with cloud-init still installed, but I haven’t had success in doing so. If the settings take and aren’t reset upon reboot then feel free to keep cloud-init installed and enabled, otherwise go to Disable/Remove cloud-init section and try these steps again.
First we need to access the settings file.
sudo nano /etc/netplan/50-cloud-init.yamlInput a config similar to this using your appropriate settings.
network:
    ethernets:
        eth0:
            dhcp4: false
            addresses: [192.168.50.2/24]
            gateway4: 192.168.50.1
            nameservers:
                addresses: [192.168.50.1]
            optional: true
    version: 2
Note: Do not use tabs. This is a yaml file. Use 4 spaces.
Use ctrl+x to exit and save the file. Then we need to tell netplan to attempt the new settings and then have it apply these settings.
sudo netplan tryIf it works it will ask if you’d like to apply the new settings. You can press enter and it should apply. I always use the apply command just to be extra sure.
sudo netplan applyNote: If you are using SSH you will lose connection when using those commands.
Now reboot to make sure the new IPs are applied.
sudo reboot nowWe should be able to connect to the Pi using the new address or it will appear on your next login if you aren’t using SSH. If it didn’t take the settings and it’s not using its previous address look for it again in the device list of your router.
Update Hostname
(Optional) Makes the device easier to identify and find on the network.
This one is simple. Takes one line and a reboot.
sudo hostname new-server-name-here
sudo reboot now
sudo hostnamectl set-hostname new-server-name-here
sudo reboot nowUpon reboot you will notice the terminal will now have USERNAME@new-server-name-here (especially if you copied everything without changing anything)
We can check the hostname manually:
hostnamehostnamectlOur current hostname will be returned to the terminal.
Disable/Remove cloud-init
(Optional) If the your IP settings were not reset by cloud-init on your reboot then you can skip this step. I still recommend disabling it as it will speedup boot times. You only really need cloud-init for the first boot.
Prevent cloud-init from starting
What this command will do is create a blank file called cloud-init.disabled inside of /etc/cloud/. When cloud-init sees this file it will not initialize during boot. This is the simplest and easiest way, however why keep the service around if you aren’t using it?
sudo touch /etc/cloud/cloud-init.disabledUninstall
Turn off all the services when you use this command [do not uncheck “none”]:
sudo dpkg-reconfigure cloud-initThese next commands will uninstall the services and remove the folders.
sudo apt-get purge -y cloud-init
sudo rm -rf /etc/cloud/ && sudo rm -rf /var/lib/cloud/
Restart and you should see a faster boot time and no cloud-init on boot.
Update the System Timezone
You may want to update your timezone. Default is usually UTC. Simply use this command and find your timezone:
sudo dpkg-reconfigure tzdataInstall Netdata
I will be using the one line auto installation script provided by Netdata in their docs. You can simply use sudo apt install netdata if you wish.
bash <(curl -Ss https://my-netdata.io/kickstart.sh)Then press enter and let it run and install. you may be asked to press enter or anser a few confirmation prompts while the script runs.
We will go into configurations after we install Docker since we need to enable a setting in there in order to have it monitor Docker Engine. No need to go into the configs more than once. We will do it all at once and restart the service when we are done with everything.
Before we continue let’s verify that it works. Visit http://new-server-name-here:19999/ or http://196.168.50.1:19999/ and substitute your IP or hostname. If it installed correctly you should see a screen similar to this:

Install Docker
The installation of Docker is very simple. The quickest and easiest way to install docker is:
sudo apt install -y docker.ioHowever Ubuntu doesn’t push feature updates to LST packages, so it might be better to use Docker’s packages. To do this we first need to make sure we have a few apps. They host the package on their own servers so we need to install certain things that will allow us to download from their servers. Official docs
We can start by running this:
sudo apt-get install \
    apt-transport-https \
    ca-certificates \
    curl \
    gnupg-agent \
    software-properties-common
Then we need to add Docker’s GPG key
curl -fsSL https://download.docker.com/linux/ubuntu/gpg | sudo apt-key add -Then we will need to verify we have the right key:
sudo apt-key fingerprint 0EBFCD88Output:
pub   rsa4096 2017-02-22 [SCEA]
      9DC8 5822 9FC7 DD38 854A  E2D8 8D81 803C 0EBF CD88
uid           [ unknown] Docker Release (CE deb) <[email protected]>
sub   rsa4096 2017-02-22 [S]
Now to add the repository to our apt sources list:
sudo add-apt-repository \
   "deb [arch=arm64] https://download.docker.com/linux/ubuntu \
   $(lsb_release -cs) \
   stable"
Now we should be able to install the latest version of Docker:
sudo apt-get update
sudo apt-get install docker-ce docker-ce-cli containerd.io
Then we should add ourself to the docker user group.
sudo usermod -aG docker USERNAMENow let’s have docker start on boot
sudo systemctl enable docker.service
sudo systemctl enable containerd.service
We can then test that Docker installed properly by running it’s own Hello World application:
sudo docker run hello-worldThis should download the latest version of Docker’s hello-world and print something similar to this into the console:
Hello from Docker!
This message shows that your installation appears to be working correctly.

To generate this message, Docker took the following steps:
 1. The Docker client contacted the Docker daemon.
 2. The Docker daemon pulled the "hello-world" image from the Docker Hub.
    (arm64v8)
 3. The Docker daemon created a new container from that image which runs the
    executable that produces the output you are currently reading.
 4. The Docker daemon streamed that output to the Docker client, which sent it
    to your terminal.

To try something more ambitious, you can run an Ubuntu container with:
 $ docker run -it ubuntu bash

Share images, automate workflows, and more with a free Docker ID:
 https://hub.docker.com/

For more examples and ideas, visit:
 https://docs.docker.com/get-started/
With Docker installed we can go back to configuring Netdata.
Netdata Config
Two things I like to do is to enable sensor monitoring to enable the temperature graph and turn on the Docker engine monitor. Let’s start with the sensors. First we have to force the sensors graph to appear.
sudo nano /etc/netdata/edit-config charts.d.confThen uncomment the line sensors=force or add it to the end of the file.
Now we need to restart netdata using sudo systemctl restart netdata. Then we can then reload the netdata page and check if the temperature sensor is appearing.
Note: if the sensors section doesn’t show up after restarting the netdata service you may need to reboot the device.
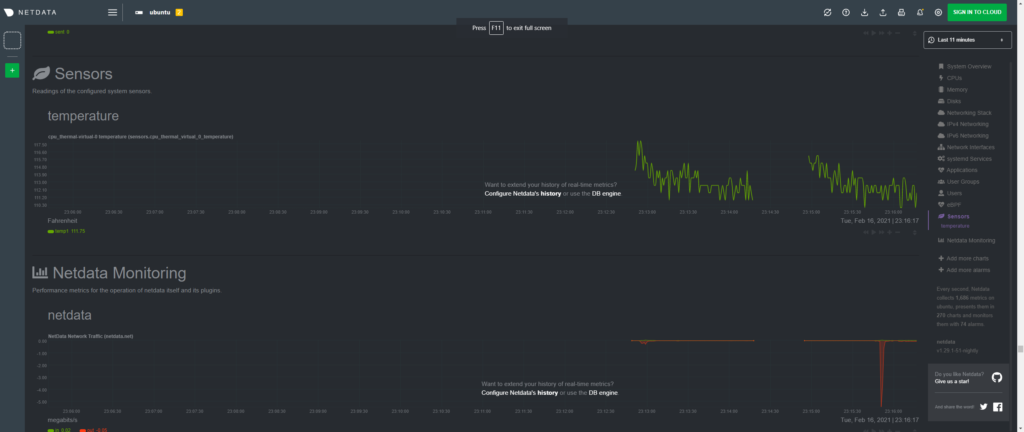
If the sensors don’t show up try checking the config files:
From the official docs.
cd /etc/netdata   # Replace this path with your Netdata config directory, if different.
sudo ./edit-config charts.d/sensors.conf
To allow netdata to monitor Docker first we will need to enable the metric-address. According to the official docs we can do that by modifying or creating this file:
sudo nano /etc/docker/daemon.jsonand insert this bit of code to that file:
{
  "metrics-addr" : "127.0.0.1:9323",
  "experimental" : true
}
Enable IPv6
(optional)
While we are in this file we can enable IPv6. Simply add this but in the js object and specify whatever local subnet you want: Official Docker Guide
"ipv6": true,
"fixed-cidr-v6": "fd00:0:0:0:1::/80"
If you did this then your final result should look similar to this:
{
  "ipv6": true,
  "fixed-cidr-v6": "fd00:0:0:0:1::/80",
  "metrics-addr" : "127.0.0.1:9323",
  "experimental" : true
}
Then we can enable the Docker engine monitor. From the official docs:
cd /etc/netdata # Replace this path with your Netdata config directory
sudo nano ./edit-config go.d/docker_engine.conf
According to the official docs all it needs is the url to docker metric-address
jobs:
  - name: local
    url: http://127.0.0.1:9323/metrics

  - name: remote
    url: http://192.168.50.2:9323/metrics
Adding the netdata user to the docker group will allow it to see the actual names of containers rather than spitting out the id of the container.
Note: if you didn’t use the script installer there will not be a netdata user.
sudo usermod -aG docker netdataAt this point we can reboot the system and check that Docker engine is now showing metrics on Netdata.
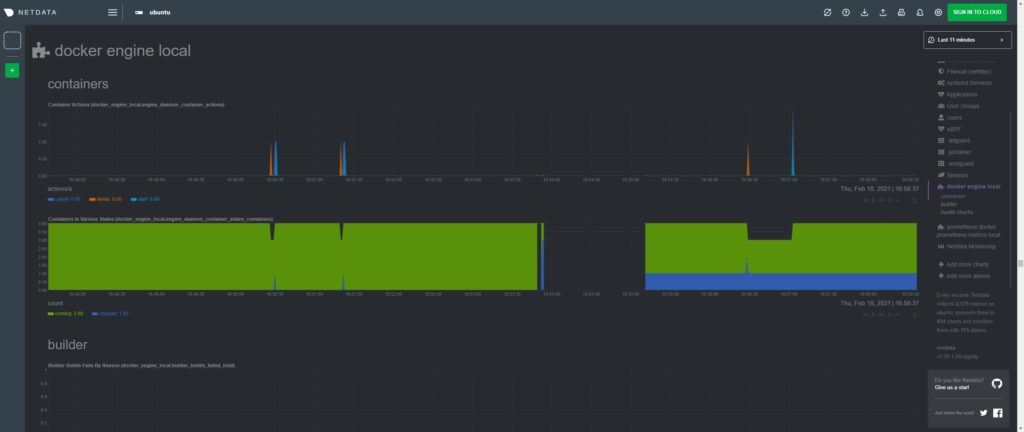
You can use their docs to learn how to enable cloud monitoring, enable more monitoring, alarms, and webhook/email alerts. I have no use for any of this so I will not be going over any of that.
Install Portainer
According to the official docs we need to run these commands:
sudo docker volume create portainer_data
sudo docker run -d -p 8000:8000 -p 9000:9000 --name=portainer --restart=always -e TZ=America/Chicago -v /var/run/docker.sock:/var/run/docker.sock -v portainer_data:/data portainer/portainer-ce
We can then visit http://new-server-name-here:9000/ or http://192.168.50.2:9000/ and substitute your IP or hostname and create our superuser account. Once your account is created we will want to connect Docker to Portainer:

You should then see your local docker endpoint.

In here we can then remove the hello-world container and it’s image. Should be self explanatory.
Tip: In the endpoints page change the Public IP of the local node to the ip/domain that you will be using to connect to the dashboard. This will add links to the “published ports” column of the containers page that you can click to easily access the dashboard of any services you create.
Install Watchtower
(optional, but recommended)
According to official docs the way we should deploy watchtower is running this in the terminal:
docker run -d \
  --name watchtower \
  -v /var/run/docker.sock:/var/run/docker.sock \
  containrrr/watchtower
After running this you should be able to see Watchtower in your portainer dashboard.
There should be no other configuration changes needed to have this service work. The app will periodically (default is every 24 hours) check the list of current containers and then check if there are any new images for those volumes and then redeploy those containers with the same variables used at it’s last deployment. It can even update itself!
docker run -d \
  --name watchtower \
  --restart always \
  -e TZ=America/Chicago \
  -e WATCHTOWER_POLL_INTERVAL=3600 \
  -v /var/run/docker.sock:/var/run/docker.sock \
  containrrr/watchtower \
  --cleanup
This is my modified parameters. I made sure the container will always attempt a restart when it is stopped, added my appropriate timezone, added the cleanup argument which will remove orphaned images after an update, and added a variable that will have the service poll for new updates every 1 hour (3600 seconds).
You can read their docs and setup webhook/email updates, monitoring other nodes, and monitoring only specified containers/services. I have no use for any of this so I will be leaving everything as is.
Install AdGuard Home
Inside portainer let’s create a new stack using a docker compose template. I modified the template I found in this tutorial and it seems to work wonders!
---
version: "2"
services:
  adguardhome:
    image: adguard/adguardhome:latest
    container_name: adguard
    #network_mode: host
    environment:
      - TZ=America/NewYork
    ports:
      - 53:53/tcp
      - 53:53/udp
      - 67:67/udp
      - 68:68/tcp
      - 68:68/udp
      - 853:853/tcp
      - 3000:80/tcp
      - 3001:3001/tcp
    volumes:
      - /srv/dev-disk-by-label-Files/AdGuard/work:/opt/adguardhome/work
      - /srv/dev-disk-by-label-Files/AdGuard/conf:/opt/adguardhome/conf
      - /etc/localtime:/etc/localtime:ro
      - /etc/timezone:/etc/timezone:ro
    restart: always
I used my own home directories for the work and conf files to make it easier to find and edit them if I needed to. Ignore the network mode. I was using that as a debug and wanted to leave it in for future use. You can remove or leave 3001, it can be used to access the edge dashboard. In order to use the edge dashboard you have to change the tag of the image to :edge instead of :latest.
IPv6 Compose
---
version: "2"
services:
  adguardhome:
    image: adguard/adguardhome:latest
    container_name: adguard
    environment:
      - TZ=America/NewYork
    ports:
      - 53:53/tcp
      - 53:53/udp
      - 67:67/udp
      - 68:68/tcp
      - 68:68/udp
      - 853:853/tcp
      - 3000:80/tcp
      - 3001:3001/tcp
    volumes:
      - /srv/dev-disk-by-label-Files/AdGuard/work:/opt/adguardhome/work
      - /srv/dev-disk-by-label-Files/AdGuard/conf:/opt/adguardhome/conf
      - /etc/localtime:/etc/localtime:ro
      - /etc/timezone:/etc/timezone:ro
    restart: always
    networks:
      - ipv6

networks:
  ipv6:
    name: ipv6
    enable_ipv6: true
    driver: bridge
    driver_opts:
      com.docker.network.enable_ipv6: "true"
    ipam:
      driver: default
      config:
        - subnet: 2001:db8:a::/64
          gateway: 2001:db8:a::1
Troubleshooting Deployment
If you have issues deploying the stack due to bind port conflicts we need first make ourselves root. Official AdGuard Home troubleshooting guide.
sudo -iYour console should now look like:
root@new-server-name-here:/#Now we need to create a file. If there is no folder where we are trying to create the file then we will make that file.
# nano /etc/systemd/resolved.conf.d/adguardhome.confNote do not copy #. I am using it to signify you should be root while executing these commands. sudo will not work.
And input this:
[Resolve]
DNS=127.0.0.1
DNSStubListener=no
If you get no errors let’s save and exit. If the folder doesn’t exist yet let’s create it.
# mkdir /etc/systemd/resolved.conf.dTry the pervious nano command again and you shouldn’t get any errors.
After that we need to restart DNSStubListener.
systemctl reload-or-restart systemd-resolvedYou shouldn’t get any further bind errors.
Use logout or exit to go back to your normal user.
root@new-server-name-here:/# exit
logout
USERNAME@new-server-name-here:~/$
After portainer deploys the stack we can visit http://new-server-name-here:3000/ or http://192.168.50.2:3000/ to setup AdGuard Home.
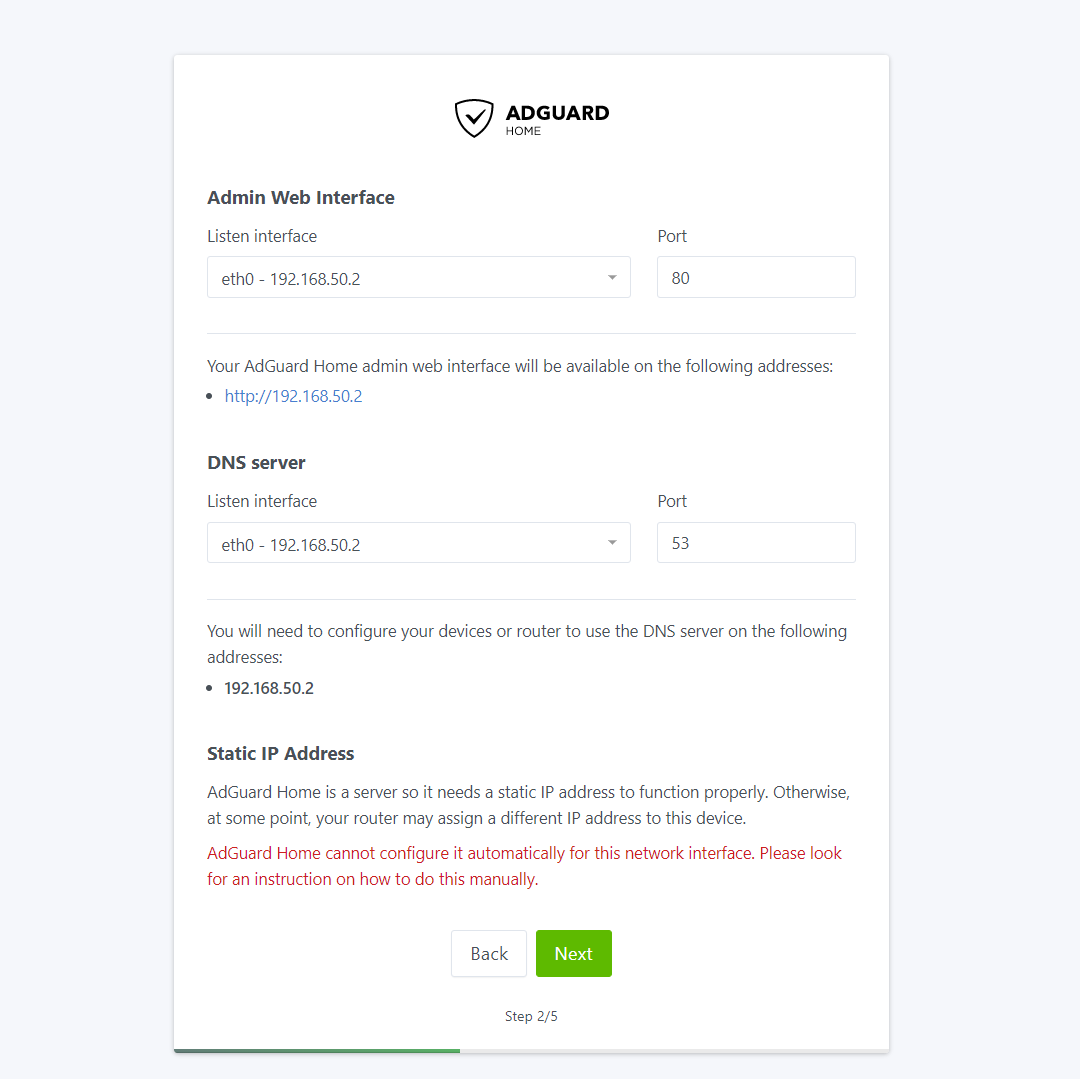
You can leave everything as it is. You can change the listen port for the web interface to whatever you wish, but be sure to update it in your compose file and redeploy the stack.
After creating the user AdGuard usually redirects to the new port you told it to listen to, but since we are pushing 3000 external into its internal 80 port (as shown in this image) you aren’t going to get back to AdGuard. Especially since we updated the listen port to 80. Simply go back to stacks, click on adguard-home (or whatever you named your stack) and click on the Editor tab. In this tab update the port to whatever port you need to. In this instance I updated - 3000:3000/tcp to - 3000:80/tcp. Of course you can update it to be - 80:80/tcp or even - 7000:80/tcp. Just remember that the left side is what you will use to access the dashboard.
You will then be asked to login again and will be brought to your dashboard.
Configure AdGuard
We can then go into the general settings page and enable the security web service and modify how long statistics are kept and if you want them anonymized. If you are the only one accessing this dashboard or it’s for your home/personal company use then it should be okay to not anonymize the information.
After that we can go configure the DNS settings. I recommend using parallel requests and DNS servers in your country for the best performance. If you are worried about privacy use DNS servers who do not log anything. AdGuard has compiled a list of well known DNS servers into this Wiki. For added security I recommend using DNS services that block malware on top of not logging activity. Some of my favorites are CloudFlare and Quad9. I also recommend using DNSMap alongside the AdGuard DNS Wiki to find even more DNS servers and the most up to date IPs and information. I try to stick to DNS-over-HTTPS and DNS-over-TLS addresses.
Here is what my config looks like:
https://dns11.quad9.net/dns-query
tls://dns11.quad9.net
https://dns.cloudflare.com/dns-query
tls://1.1.1.1
https://doh.opendns.com/dns-query

9.9.9.11
149.112.112.11
2620:fe::11
2620:fe::fe:11
1.1.1.1
1.0.0.1
2606:4700:4700::1111
2606:4700:4700::1001
84.200.69.80
84.200.70.40
2001:1608:10:25::1c04:b12f
2001:1608:10:25::9249:d69b
8.26.56.26
8.20.247.20
8.20.247.2
209.244.0.3
209.244.0.4
2620:119:35::35
2620:119:53::53
199.85.126.10
199.85.127.10
208.67.222.222
208.67.220.220
After inserting all your DNS server test and apply the settings.
Some additional settings to consider changing on this page are:
Increasing the DNS rate limit requests. Especially if you have multiple devices or multiple people on this network.
Enabling DNSSEC.
Configure your blocking mode. I prefer to use “Null IP” so that most services won’t continuously try to connect to blocked domains and IPs. REFUSED and Custom IPs should also help cut down on multiple retries as well.
Now let’s get the filters setup. You can add any repository you’d like under the filters tab. I normal enable everything under General and Security when you click on the “choose list” button.
With AdGuard configured let’s have the router use it!
Route Network Traffic to AdGuard
Going back to the router’s dashboard and logging in we can start by going to the WAN page.
Under WAN DNS Setting turn off Connect to DNS Server automatically and input the IP address of the Pi. I also like to enable Forward local domain queries to upstream DNS and DNSSEC support and validate unsigned replies.

We can click apply and watch as DNS queries start to populate on AdGuard.
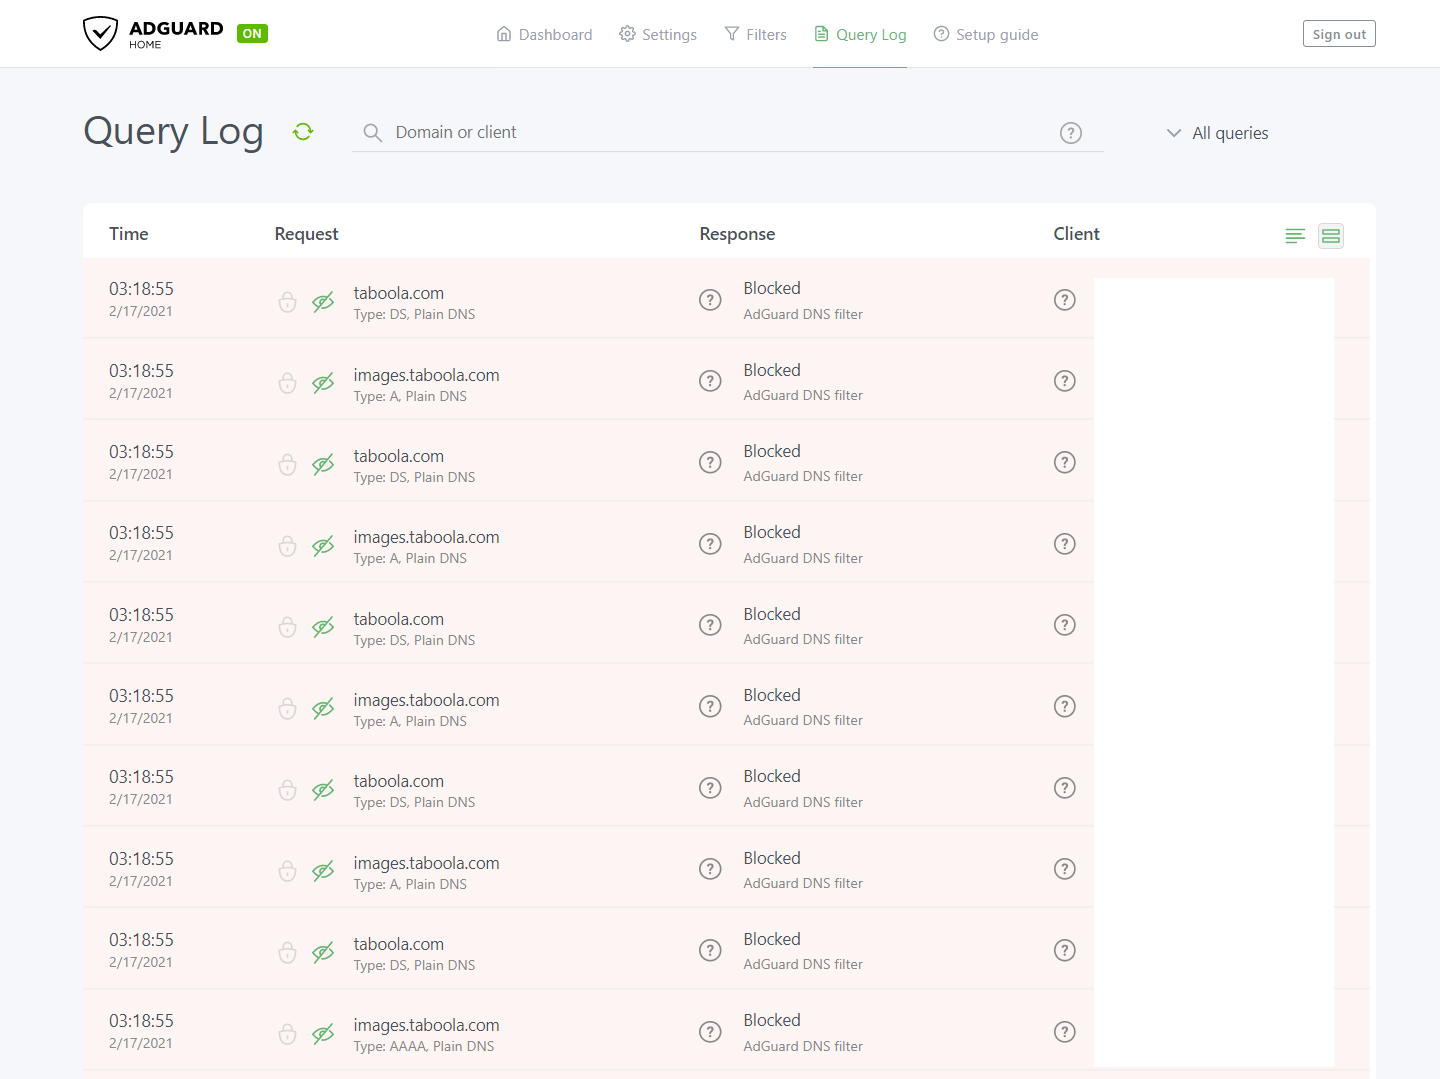
You may notice all traffic appears to be coming from 1 source (the router). If you want to more finely monitor which device is making which request we will have to update the LAN DNS settings. We can do that by going to the LAN page of the router’s dashboard and then clicking on the DHCP Server settings. In this page we need to update the DNS and WINS Server Setting section by adding the address of the Pi into the field and turning off Advertise router's IP in addition to user-specified DNS

Now there will be more detailed and precise information such as which device is making the DNS query.
This may not be enough for you and you may want to use the advanced setting of AdGuard such and blocking things with the MAC address of a device. In the next section we will go over how to enable DHCP on AdGuard. If that isn’t the reason then you may have noticed that device names don’t always appear on AdGuard’s dashboard.
We can now visit a site that typically has a lot of ads and watch as they fail to populate. Sometimes this will leave empty boxes and sometimes the elements don’t load at all. Obviously this isn’t the end to extension based ad-blockers, but it can and will prevent ads on mobile devices and even smart TVs.
With my adblock extension paused I visited a site that has many ads. We can see that now appear as blank boxes. It’s not the most aesthetically pleasing, but it is better than a bunch of pesky ads.

Here is the same page on my phone.

If anything else it speeds up DNS query times, speeds up site load times since they don’t have to load ads, enables DNSSEC, hides the queries from your ISP, and blocks malware natively and from the source DNS server if you use the right DNS servers.
Enable DHCP on AdGuard
(Optional)
Note: If you want to use the DHCP server you will have to use the first docker compose file and uncomment the network_mode argument. Adguard will get all the IPv6 information it needs as the network host so there is no need to include any of it. You can also leave out all of the ports as that too won’t be needed while in network host mode.
---
version: "2"
services:
  adguardhome:
    image: adguard/adguardhome:edge
    network_mode: host
    container_name: adguard
    environment:
      - TZ=America/Chicago
    volumes:
      - /srv/dev-disk-by-label-Files/AdGuard/work:/opt/adguardhome/work
      - /srv/dev-disk-by-label-Files/AdGuard/conf:/opt/adguardhome/conf
      - /etc/localtime:/etc/localtime:ro
      - /etc/timezone:/etc/timezone:ro
    restart: always
Should be the updated compose file
It is recommended you use the “check for DHCP servers” function on the DHCP settings page. It won’t always show other DHCP servers, especially if you are currently using a static ip, but it can help identify port bind conflicts.
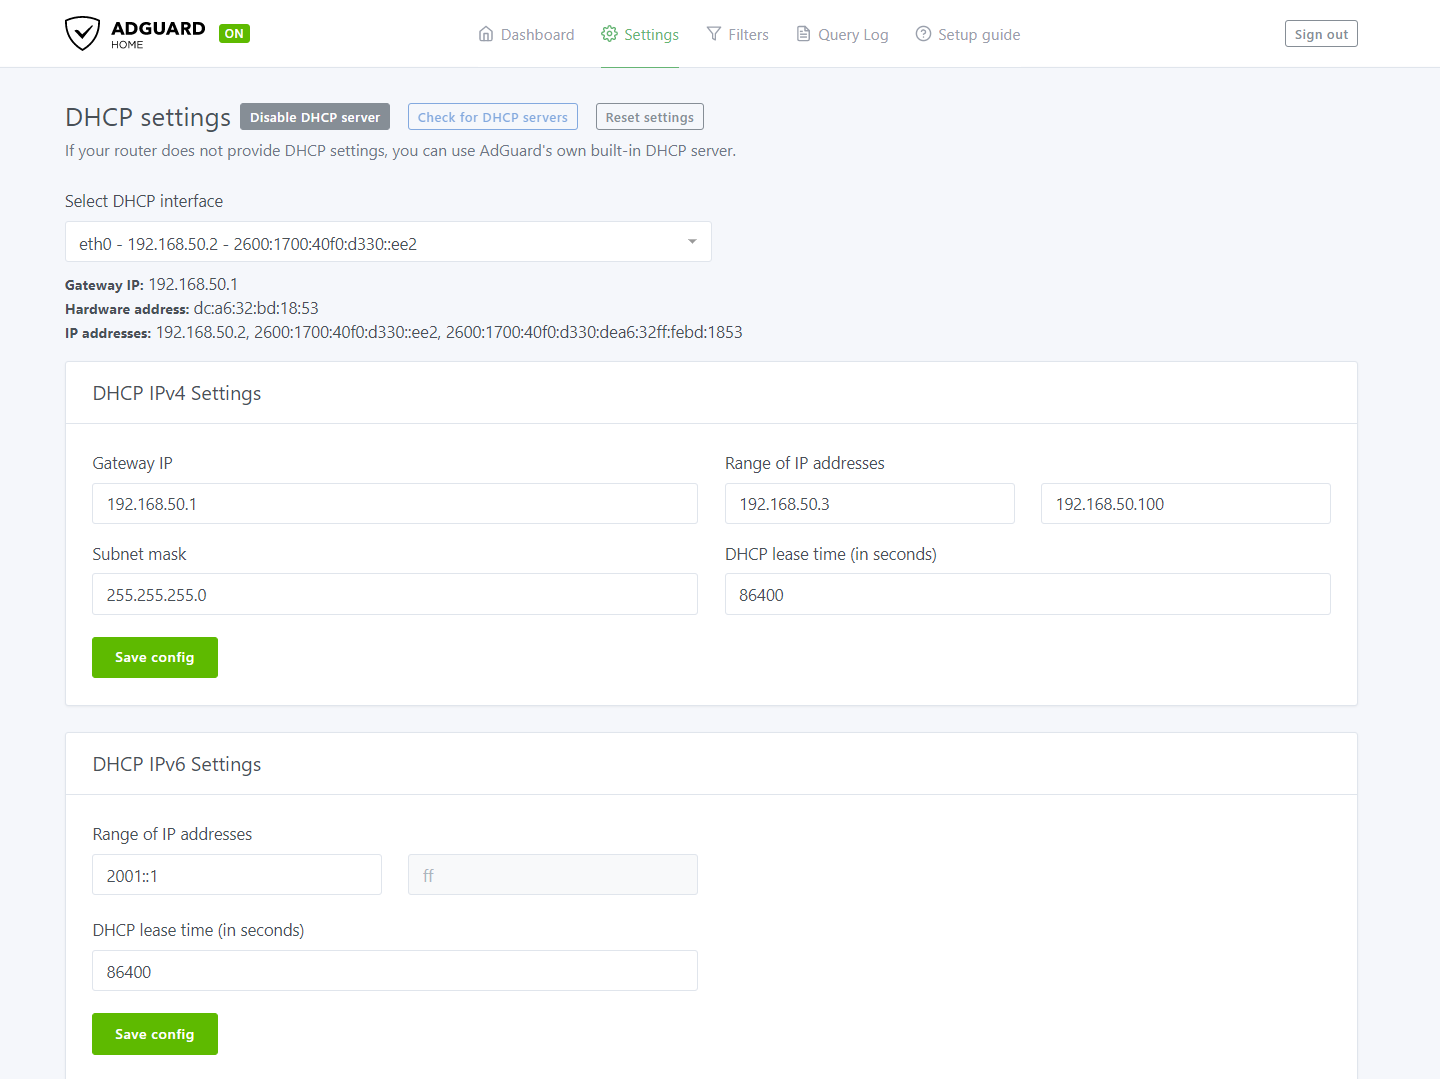
I didn’t have any conflicts so I simply input the settings I wanted and clicked apply.
The page gives you a hint at what you should be inputting.
NOTE: The gateway IP is the IP of your router NOT the IP of your Pi, Docker, or the network bridge.
Now we need to disable the DHCP settings from the router. This can be done by going back into the DHCP setting tab in the LAN page. Then we simply disable the DHCP server on the router.
Troubleshooting Tip
If for whatever reason you cannot get an IP from AdGuard apply a static IP to your device using the IP of your router as the gateway and CloudFlare(1.1.1.1) or Google(8.8.8.8,) as your DNS.
Now if we check the query logs and dashboard we can see device names under “top clients” and in the query logs.
Trade Off: The router will no longer receive device names. It will be replaced with generic names or [MAC Address]. Obviously this can be fixed by manually applying names (since the router still gets MAC addresses even when it isn’t the DHCP server).
Install WireGuard
(optional for VPN to home network)
Linuxserver has made a Wireguard container for anyone to use. Linuxserver makes and maintains the largest collection of docker images in the web. If the devs themselves don’t offer docker images then odds are Linuxserver will have you covered.
Why Wireguard? Why not OpenVPN?
- Support – OpenVPN server doesn’t support ARM (AArch). In fact a lot of devs don’t because arm is usually too lower powered to keep up with larger or more resource heavy applications and services.
- Security – Wireguard is more secure. It uses more advanced cryptography.
- Minimal code – means they only use as many lines of code as the application needs to run. Making it harder to attack.
- Built for linux – means it is perfect for use in servers, routers, and most phones since majority of the kernels are linux based. Combine that with the advanced and fast cryptography they use means less time waiting for auth and decryption which means you connect to the server faster.
- Simple and easy to use – The server will generate a QR code for you to scan with your phone for the easiest setup imaginable. No more exporting and importing files. No guessing setting and ports. It just works.
- Uncommon ports – Wireguard uses some very uncommon ports that most port scanning attacks don’t check for which makes the server and network more secure.
According to the official docs the recommended way to create this container is with Docker compose. I modified their template for my own use, again putting config directories in my own home folder, using my own timezone, using AdGuard as the DNS, specifying 1 peer, and providing my asus.com DDNS url.
---
version: "2.1"
services:
  wireguard:
    image: linuxserver/wireguard:latest
    container_name: wireguard
    cap_add:
      - NET_ADMIN
      - SYS_MODULE
    environment:
      - PUID=1000
      - PGID=1000
      - TZ=Central/Chicago
      - SERVERURL=lucids-pi4-project.asuscomm.com #optional
      - SERVERPORT=51820 #optional
      - PEERS=1 #optional
      - PEERDNS=192.168.50.2 #optional
      - INTERNAL_SUBNET=10.13.13.0 #optional
    volumes:
      - /srv/dev-disk-by-label-Files/Wireguard/config:/config
      - /lib/modules:/lib/modules
    ports:
      - 51820:51820/udp
    restart: always
After putting this in the stacks page and clicking deploy we should see the new container called “wireguard”.
Now to connect to the server we will install the client to our applicable device. I will be using android. Wireguard Installation
If you need the config file you will need to retrieve it from /srv/dev-disk-by-label-Files/config/Wireguard/config/peer1/ and substitute peer1 with the applicable peer file you need. I will be showing you how to get the qr code for a mobile device.
To get the qr code we will be using this command:
docker exec -it wireguard /app/show-peer 1This will show the qr code of peer 1 in the console.
Note: You can copy the conf file to your local (Windows) machine using scp. You will need to download pscp.exe from PuTTY. You can use this code to copy the conf file to your desktop:
pscp -P 22 [email protected]:/srv/dev-disk-by-label-Files/config/Wireguard/config/peer2/peer2.conf C:\Users\<YOUR_USER>\DesktopNote: there may be some permissions issues with this directory and file. You may need to use chmod on the peerx direcory and peerx.config in order to access and transfer the file.
I can then scan that code using the android app and it will automatically be added to the app.
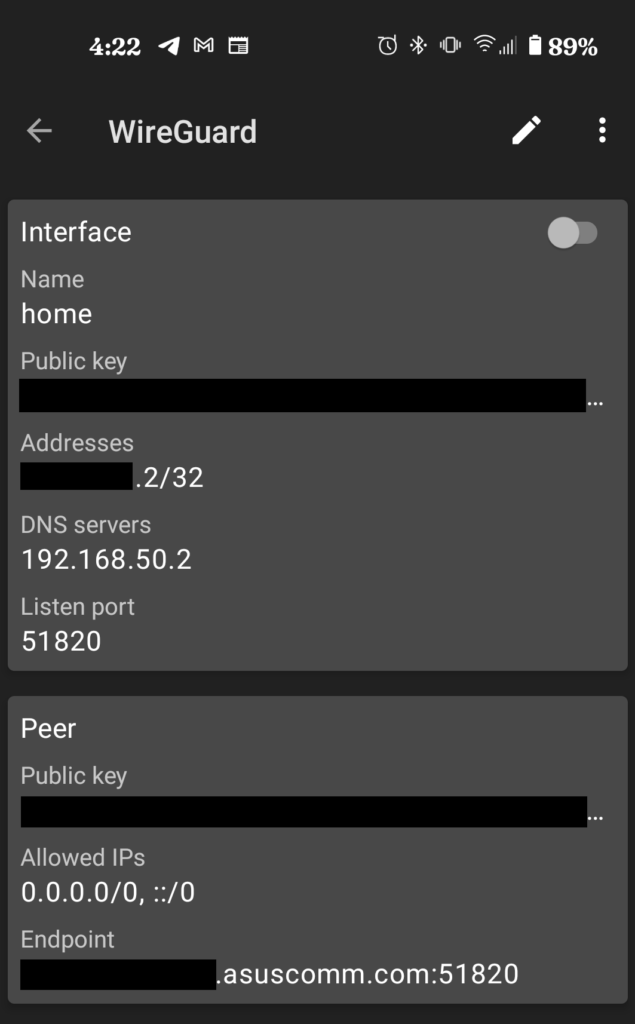
Before we can connect we need to forward the port of Wireguard on the router. Under the WAN page click Virtual Server / Port Forwarding tab and input the port from the config file.

With the port now forwarded we can then test that the connection works by attempting to connect to it using mobile data.

As we can see the connection is established and is using the IP of AdGuard for the DNS. Let’s test by going to another ad-heavy site and we can see that the VPN is using AdGuard as it’s DNS. The key icon in my status bar indicates I am connected to the VPN.

Everything is working as it should.
Note: Most residential ISPs don’t offer enough bandwidth to maintain a fast or reliable connection to your private VPN so this is only recommended for those super pesky sites that bury content behind multiple ad overlays or break every half paragraph with an ad. It probably won’t be fast enough to connect to all the time. Your results may vary and will depend on the speed offered from your home ISP as well as the network you are tunneling through.
Wrapping up
If you followed everything in this tutorial you should now have a fully functional DNS blackhole that you can use on the go through VPN all containerized within docker that will update when there are new updates.
I will expand this guide as I explore new services and apps to use for my personal use. This will include testing a self hosted “cloud” storage solution, self hosting a password manager, self hosting a Google Docs alternative and more! Once I setup any of those up and think it is feasible enough to replace things like Google Drive, Google Docs, etc I will add them to the tutorial.
I also plan to remake the tutorial once the USB boot bug is fixed on Ubuntu Server. I will be fresh installing with that update so fixing the guide won’t be too much of a hassle.
Another thing to keep in mind: you aren’t guaranteed to get faster io speeds by using a usb drive over an SD card. You may see decent improvements, but it’s really nothing that’s going to beat using a normal drive for the Pi. I recommend using an SSD over USB 3.0 with a controller that supports UASP.
I would like to remind you again that I was not paid or sponsored to make this tutorial. You may have also noticed that there are no ads on this site too. If you like my tutorial or found it useful please consider leaving me a tip or supporting me on Patreon. Donation Page.

